How to setup ecFlow with HTTPS authentication?
This section builds on section How use ecFlow with HTTP/HTTPS? and describes how to set up an environment with HTTPS authentication for ecFlow.
This setup required the deployment of three main components:
ecFlow: An ecFlow server, which must be started with the –http option to enable HTTP communication.
Authentication Service: An authentication service (namely, Auth-o-tron) to manage user authentication and provide secure access to the ecFlow server.
Reverse Proxy Service: A reverse proxy server (e.g., NginX) that will handle HTTPS requests, redirect authentication requests to the Authentication Service and eventually forward the already authenticated requests to the ecFlow server over HTTP.
This guide provides a high-level overview of the steps required to set up this environment, and assumes that ecFlow runs on port 8888, Auth-o-tron on port 8080, and handles HTTPS requests on the standard port 443.
Setting up the ecFlow Server
The ecFlow server is started with the –http option to enable HTTP communication binding to port 8888, for example:
ecflow_server --http --port 8888
Setting up the Authentication Service
The Authentication Service (Auth-o-tron) is responsible for managing user authentication. It should be configured to handle authentication requests and provide secure access to the ecFlow server.
Using Docker is a convenient way to deploy Auth-o-tron.
Start by providing a configuration file (e.g., config.yaml) that defines the authentication providers. An example config.yaml file, configuring the ECMWF API provider and running Auth-o-tron on port 8080, might look like this:
version: 1.0.0

logging:
  level: "debug"
  format: "console"

auth:
  timeout_in_ms: 3000 # 3 seconds

providers:
  - name: "ecmwf-api-provider"
    type: "ecmwf-api"
    uri: https://api.ecmwf.int/v1
    realm: "ecmwf"
  - name: "plain-provider"
    type: "plain"
    realm: "local"
    users:
    # For testing purposes only, do not use in production
      - username: "someuser"
        password: "somesecret"

store:
  enabled: false

services: []

jwt:
  exp: 3600
  iss: authotron-issuer
  secret: authotron-secret-key
  aud: authotron-audience

include_legacy_headers: True

bind_address: 0.0.0.0:8080
Then, run the Auth-o-tron Docker container with the following command, which binds the configuration file and exposes the service on port 8080:
docker run -d -p 8080:8080 -v /path/to/your/config.yaml:/app/config.yaml eccr.ecmwf.int/auth-o-tron/auth-o-tron:0.2.5
For further information on how to set up Auth-o-tron, please see the instructions provided in the Auth-o-tron documentation.
Setting up the Reverse Proxy
Considering NginX as the reverse proxy server, configure it to listen for HTTPS requests on port 443 which are forwarded to the ecFlow server after authentication.
Below is an example configuration for NginX:
server {
    listen 443 ssl;
    server_name your_domain.com;

    ssl_certificate /path/to/your/certificate.crt;
    ssl_certificate_key /path/to/your/private.key;

    location / {
        proxy_pass http://localhost:8888;  # Forward to ecFlow server
        proxy_set_header Host $host;
        proxy_set_header X-Real-IP $remote_addr;
        proxy_set_header X-Forwarded-For $proxy_add_x_forwarded_for;
        proxy_set_header X-Forwarded-Proto $scheme;
    }
}

server {
  listen 80;
  listen [::]:80;
  server_name your_domain.com;
  return 301 https://$host$request_uri; # Redirect HTTP to HTTPS
}

server {
  listen 443 ssl;
  listen [::]:443 ssl;
  server_name your_domain.com;

  ssl_certificate /path/to/your/certificate.crt;
  ssl_certificate_key /path/to/your/private.key;

  # Define server root access -- can be used to serve static content
  location / {
    root /usr/share/nginx/html/server;
    index index.html index.htm;

    access_log /usr/share/nginx/html/server/access.base.log;
  }

  # Define the Authentication redirection
  #  -- to the Auth-o-tron service running on port 8080
  location = /auth {
    internal;
    proxy_pass http://localhost:8080/authenticate;
    proxy_pass_request_body off;
    proxy_set_header Content-Length "";
    proxy_set_header X-Original-URI $request_uri;
  }

  # Define the ecFlow redirection
  #  -- to the ecFlow server running on port 8888
  location /v1/ecflow {
    proxy_read_timeout 500s;
    proxy_connect_timeout 90s;

    auth_request /auth;

    proxy_pass          http://localhost:8888/v1/ecflow;

    # Forwarding Authorization Headers:
    # * Authorization   [Bearer <token>]
    auth_request_set    $authorization $upstream_http_authorization;
    proxy_set_header    Authorization $authorization;
    # * X-Auth-Username [username]
    auth_request_set    $auth_username $upstream_http_x_auth_username;
    proxy_set_header    X-Auth-Username $auth_username;
    # * X-Auth-Realm    [realm]
    auth_request_set    $auth_realm $upstream_http_x_auth_realm;
    proxy_set_header    X-Auth-Realm $auth_realm;
    # * X-Auth-Roles    [role[,role]*]
    auth_request_set    $auth_roles $upstream_http_x_auth_roles;
    proxy_set_header    X-Auth-Roles $auth_roles;

    proxy_set_header    X-Real-IP $remote_addr;
    proxy_set_header    X-Forwarded-For $proxy_add_x_forwarded_for;
    proxy_set_header    X-Forwarded-Proto $scheme;
    proxy_set_header    Host $host;

    proxy_redirect      default /;

    access_log /usr/share/nginx/html/server/access.ecflow.log;
  }

  # Define error pages
  error_page 500 502 503 504 /50x.html;
  location = /50x.html {
    root /usr/share/nginx/html/server;
  }
}
The NginX reverse proxy can be run as a Docker container as well. Make sure to mount the NginX configuration file and SSL certificates into the container. :
docker run -d -p 443:443 -v /path/to/your/nginx.conf:/etc/nginx/nginx.conf -v /path/to/your/certificate.crt:/etc/ssl/certs/certificate.crt -v /path/to/your/private.key:/etc/ssl/private/private.key nginx
With this setup, users can access the ecFlow server securely over HTTPS. The reverse proxy will handle authentication via Auth-o-tron and forward authenticated requests to the ecFlow server over HTTP.
Setting up the ecFlow Client
The ecFlow Client (CLI or UI) can connect to the ecFlow server through the reverse proxy using the HTTPS connection details. In both cases the client must provide one of the following authentication methods:
ECMWF API key (recommended when using the ECMWF API provider in Auth-o-tron)
Username and password (when using the plain provider in Auth-o-tron)
The client uses the .ecflowapirc configuration file to define the server connection details. The client searches for this file in the following locations (in order):
The current working directory
The user’s home directory (e.g., ~/.ecflowapirc)
The .ecflowapirc file should contain the following entries:
{
  "version": 1,
  "tokens" : [
    {
      "server": "<server-name-or-pattern>",
      "type"  : "bearer",
      "api"   : {
        "url"  : "https://api.ecmwf.int/v1",
        "key"  : "<user-key>",
        "email": "<user-email>"
      }
    },
    {
      "server": "<server-name-or-pattern>",
      "type"  : "basic",
      "api"   : {
        "username": "<username>",
        "password": "<password>"
      }
    }
  ]
}
Replace <server-name-or-pattern> with the actual server name or a pattern that matches the server name (e.g., your_domain.com or .* to match any server). The <user-key> and <user-email> should be replaced with the user’s ECMWF API key and email address, respectively, when using the bearer token method. Alternatively, <username> and <password> should be replaced with the user’s credentials when using the basic authentication method.
The client will use the first matching entry based on the server name.
ecFlow CLI example
To interact with the ecFlow server using the command-line interface (CLI), the connection details are specified in the .ecflowapirc file as described above.
The following command can be used to ping the ecFlow server through the reverse proxy using HTTPS. Notice that the –https option is used to indicate that the connection should be made over HTTPS, using the provided host and port. The Authentication mechanism is automatically handled by the client based on the .ecflowapirc configuration.
ecflow_client --host your_domain.com --port 443 --https --ping
When the client is started by a task script (i.e. without any inherent user context) the connection to the ecFlow server can be done using HTTP thus avoiding the need for Authentication. The following command can be used to notify the conclusion of a task to the ecFlow server:
export ECF_PORT=<internal_ecflow_port>
export ECF_HOST=<internal_ecflow_host>
export ECF_NAME=<task-name>
export ECF_PASS=<task-pass>
export ECF_TRYNO=<task-tryno>
export ECF_RID=<task-rid>

ecflow_client --http --complete

# or, equivalently

ecflow_client --host $ECF_HOST --port $ECF_PORT --http --complete
Alternatively, in order to access the ecFlow server using HTTPS, the task must provision the client with the .ecflowapirc file containing the authentication details as described above, in which case the client can be use the –https option.
ecFlow UI example
To interact with the ecFlow server using the graphical user interface (UI), the connection details are specified in the .ecflowapirc file as described above.
Configure the ecFlow UI to connect to the ecFlow server through the reverse proxy using HTTPS. In the connection dialog “Add server”, specify the Host (e.g., your_domain.com), Port (443), and check the option to use HTTPS.
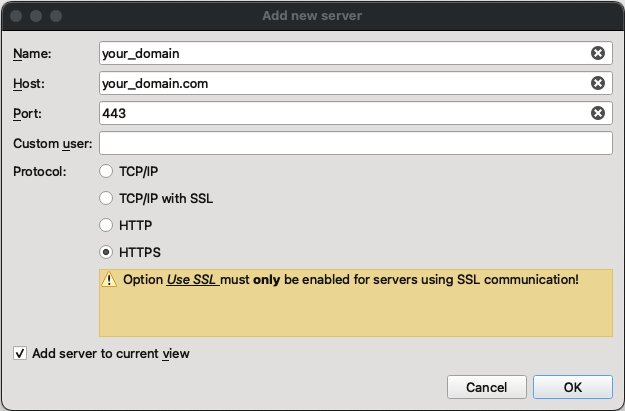
Fig. 8 ecFlow UI HTTPS connection dialog
The Authentication mechanism is automatically handled by the UI based on the .ecflowapirc configuration.
Technical Notes
Authentication Headers
The client sends authentication information to the reverse proxy including the following HTTP headers:
Authorization: Contains the Bearer token for authentication.
The following Authentication headers are used by the reverse proxy to forward authentication information to the ecFlow server:
X-Auth-Username: Contains the username of the authenticated user (legacy support).
X-Auth-Realm: Contains the realm of the authenticated user (legacy support).
X-Auth-Roles: Contains the roles associated with the authenticated user (legacy support).
The ecFlow server extracts the username, realm, and roles from these headers to manage user access and permissions. The X-Auth-Username header is currently mandatory for the ecFlow server to identify the user, while the X-Auth-Realm and X-Auth-Roles headers are optional and used for additional context. The content provided in the X-Auth-Username header is used as user identity information, and the server uses it to enforce access controls and permissions (i.e. read, write permissions based on the configured whitelist via ECF_LISTS).
Important
When using HTTPS authentication, the ecFlow server does not perform its own authentication checks. In particular, this means that user password information, provided via ECF_PASSWD, is not used by the ecFlow server.