Quickstart
This page gives a simple exercise that will allow you to create a very simple ecFlow server, load it with a small suite of minimal tasks and interact with it using the graphical user interface, ecFlowUI.
Once you have completed this, the Tutorial is a great way to gradually familiarise yourself with more details of ecFlow.
Create a directory to work in
The instructions here will assume we are working in the directory:
mkdir -p $HOME/ecflow/quickstart
cd $HOME/ecflow/quickstart
but any directory will do.
Download the example suite definition
Click the following link to download the files needed to define our sample suite:
Or download directly from your terminal:
wget https://sites.ecmwf.int/repository/ecflow/test-data/tutorial/ecflow_quickstart.tar.gz
Now, move it into your chosen working directory and untar it:
tar xzvf ecflow_quickstart.tar.gz
Inspect and update the suite definition
The file quickstart.def defines a suite called “quickstart”. Open this file in a
text editor and note the structure.
suite quickstart
   edit ECF_HOME "/replace/with/own/home/ecflow/quickstart"
   task t1
   task t2
      trigger t1 eq complete
endsuite
We define a suite called “quickstart”; it defines a variable called ECF_HOME, then it defines two tasks (“tasks” are things that actually run) and specifies that task t2 will be run as soon as task t1 has completed. The scripts corresponding to the tasks are specified in “.ecf” files in the quickstart directory. Have a look - they simply print some information about themselves, then sleep for 2 seconds.
The first thing you must do is to complete the path to your working directory in the ECF_HOME definition in test.def and save the file.
Start an ecFlow server
At ECMWF, each ecFlow server is set up to run on its own virtual machine (VM). See HPC2020: Using ecFlow for more details on setting up and using ecFlow at ECMWF.
If attending a training course at ECMWF, you will liklely have an ecFlow server set up for you already, with host ecfg-$USER-1 and port 3141.
If you are running directly on the VDI (recommended), you will have the ecFlow client and UI commands available to you immediately. If your terminal is logged onto the HPC, you will first need to load the ecflow module:
module load ecflowFrom your terminal, check that you can communicate with your server. Note that we do not need to specify
--port=3141because that is the default port number.ecflow_client --ping --host=ecfg-$USER-1 ecflow_client --stats
If that succeeds, then it would be a good idea to do the following in order to avoid
adding --host to each command:
export ECF_HOST=ecfg-$USER-1
We will start a new running instance of an ecflow_server using the
default port, which is 3141. It is possible to use a different port by adding
--port=3500 (for example) to every ecFlow command-line action, or by setting
the environment variable ECF_PORT to the desired port number. Note also
that we start it as a background task - it will run until the server is
stopped. It can be run in the foreground, but in that case you will need
to use a new terminal for any subsequent commands!
ecflow_server &
Check that it is running using the ecflow_client:
ecflow_client --ping
ecflow_client --stats
Load your suite definition into the server
ecflow_client --load=quickstart.def
Check that it is loaded by asking the server to give you back the suite definition:
ecflow_client --get
Monitor and interact via the GUI
Start ecFlowUI:
ecflow_ui &
Once ecFlowUI has started, you must tell it how to reach your server. Go to the Servers → Manage Servers menu, click “Add server”, then enter the details of your server. Name can be anything you want - it’s for you to identify the server to your self; something like “myserver” would be fine here. Host should in this case be either “localhost” in the case of running on a single machine, or at ECMWF the name of your ecFlow server VM (e.g. “ecf-gen-<user>-1” where <user> is spelled out to your user id), and Port should be 3141 unless you changed it when starting the server. The other fields can be left blank, but keep the “Add server to current view” box ticked.
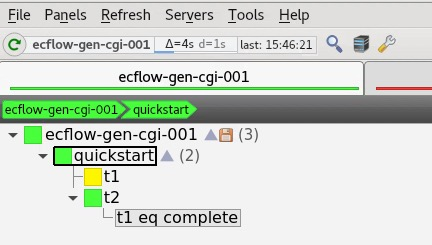
You should now see your suite loaded into the GUI! Note that if some of the following commands are not visible from the interface, you may need to tell ecFlowUI to change to a more powerful mode: Tools->Preferences->Menu mode->Administrator. By default, some high-level functions such as starting and stopping a server or a suite are not available. This is by design, for your own safety!
If the server is not currently active, right-click on the top-level node representing the server and choose “Restart”. Now right-click on the “quickstart” node and choose “Begin” to make the suite active. The default behaviour is to only refresh its view of the suite every 60 seconds, so you will need to click the green refresh button at the top every so often to see the progress of the tasks.
Note: if you need to make any changes to the suite definition (e.g. you forgot to change the ECF_HOME variable), see the bottom of page Loading the suite for instructions on how to reload an existing suite.